弄个 Hysteria 代理服务器
序
2024 黑五,在 RackNerd 弄了个 VPS,随便找了个域名商弄了个域名,弄上 Hysteria 试试。
先用 SSH 客户端连接上 VPS,我选择用 BitVise,因为编辑 config.yaml 会方便一些。
然后给域名加个 A 类型的域名解析,指向 VPS 的 IP 地址。
| A | xxxxxx.xxx | xxx.xxx.xxx.xxx |
|---|
服务端
安装 curl
bash
apt updatebash
apt install curl# curl --version
curl 7.58.0 (x86_64-pc-linux-gnu) libcurl/7.58.0 OpenSSL/1.1.1 zlib/1.2.11 libidn2/2.0.4 libpsl/0.19.1 (+libidn2/2.0.4) nghttp2/1.30.0 librtmp/2.3
Release-Date: 2018-01-24
Protocols: dict file ftp ftps gopher http https imap imaps ldap ldaps pop3 pop3s rtmp rtsp smb smbs smtp smtps telnet tftp
Features: AsynchDNS IDN IPv6 Largefile GSS-API Kerberos SPNEGO NTLM NTLM_WB SSL libz TLS-SRP HTTP2 UnixSockets HTTPS-proxy PSL执行 Hysteria 安装脚本
参见 Linux 服务端部署脚本,执行以下脚本
bash
bash <(curl -fsSL https://get.hy2.sh/)bash <(curl -fsSL https://get.hy2.sh/)
# bash <(curl -fsSL https://get.hy2.sh/)

Checking for installed version ... not installed
Checking for latest version ... v2.6.0
Downloading hysteria binary: https://github.com/apernet/hysteria/releases/download/app/v2.6.0/hysteria-linux-amd64 ...
  % Total    % Received % Xferd  Average Speed   Time    Time     Time  Current
                                  Dload  Upload   Total   Spent    Left  Speed
  0     0    0     0    0     0      0      0 --:--:-- --:--:-- --:--:--     0
100 17.8M  100 17.8M    0     0  28.3M      0 --:--:-- --:--:-- --:--:-- 28.3M
Installing hysteria executable ... ok
Install /etc/hysteria/config.yaml ... ok
Creating user hysteria ... ok
Install /etc/systemd/system/hysteria-server.service ... ok
Install /etc/systemd/system/hysteria-server@.service ... ok

Congratulation! Hysteria 2 has been successfully installed on your server.

What's next?

  + Take a look at the differences between Hysteria 2 and Hysteria 1 at https://hysteria.network/docs/misc/2-vs-1/
  + Check out the quick server config guide at https://hysteria.network/docs/getting-started/Server/
  + Edit server config file at /etc/hysteria/config.yaml
  + Start your hysteria server with systemctl start hysteria-server.service
  + Configure hysteria start on system boot with systemctl enable hysteria-server.service
编辑 config.yaml
根据上一步安装完成的提示
Edit server config file at
/etc/hysteria/config.yaml
参照 服务端,编辑 /etc/hysteria/config.yaml 文件。
config.yaml
yaml
# listen: :443

acme:
  domains:
    - xxxxxxxx.xxx
  email: xxxxx@xxx.xxx

auth:
  type: password
  password: xxxxxxxxxxxxxxxx

masquerade:
  type: proxy
  proxy:
    url: https://www.google.com/
    rewriteHost: true
这里的 password 可以用 1Password 的 Password Generator 生成。
systemctl
配置好 config.yaml 后,用 systemctl 启动 hysteria:
bash
systemctl start hysteria-server.servicebash
systemctl enable hysteria-server.service# systemctl status hysteria-server.service
● hysteria-server.service - Hysteria Server Service (config.yaml)
Loaded: loaded (/etc/systemd/system/hysteria-server.service; enabled; vendor preset: enabled)
Active: active (running) since Tue 2024-12-10 13:54:10 GMT; 21s ago服务端至此配置完。
客户端
Windows、Android
家里的电脑是 Windows。
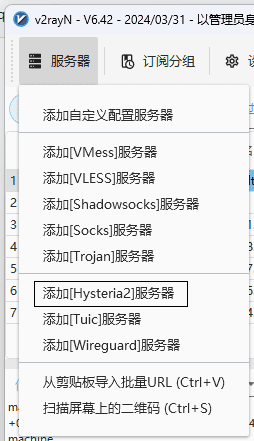
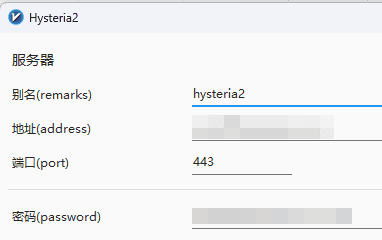
我用的是 v2rayN,点击 添加[Hysteria2]服务器,然后 地址 填上域名,密码填上服务端配置的密码就行了。


Android 则是用的 v2rayNG,扫描 v2rayN 生成的二维码就行了。
macOS
公司的电脑是 macOS。
在 Hysteria 的 release 页面,下载最新的 hysteria-darwin-arm64 ,然后参照 客户端,在 hysteria-darwin-arm64 同目录创建一个 config.yaml 文件,内容如下:
yaml
server: <域名>:443

auth: <密码>

bandwidth:
  up: 20 mbps
  down: 100 mbps

socks5:
  listen: 127.0.0.1:1080

http:
  listen: 127.0.0.1:8080
<域名> 替换为自己的域名,<密码> 替换为上述在服务端配置的密码。
然后打开终端,执行 ./hysteria-darwin-arm64 即可。
% ./hysteria-darwin-arm64

INFO connected to server {"udpEnabled": true, "tx": 2500000, "count": 1}
INFO use this URI to share your server {"uri": "hysteria2://■■■■■■■■■■■■■■■■■■■■■■■■■■■■"}
INFO HTTP proxy server listening {"addr": "127.0.0.1:8080"}
INFO SOCKS5 server listening {"addr": "127.0.0.1:1080"}
结
初步体验下来感觉还行。
之前用 v2ray 套了层 Cloudflare CDN,用着挺难受的。